Monday 15 August 2016

It's glut time again - Zuchini Rose Bake

Courgettes - Zuchini Rose Bake


Ingredients

  • 5-7 courgettes
  • 500g cherry tomatoes
  • 1 pack goats cheese
  • 2 tbsp olive oil
  • 1 bulb garli
Directions

Using a peeler, make long slices of courgette, stopping once you get to the centre 'pith' and discard rest of courgette

Roll the courgette slices in to 'roses' and place in a large baking tray

Once the baking tray is full of courgette roses, place small pieces of garlic in each rose

Cover with halved cherry tomatoes and goats cheese

drizzle with olive oil and bake in oven at 180 for 45 minutes

It's glut time again - Courgette Frittata

Courgettes: courgette frittata


Ingredients

  • 3-4 courgettes, sliced
  • 1 onion, diced
  • 3 eggs
  • 1 tbsp olive oil
Directions

Heat the oil in a heavy frying pan and add the onions - fry until golden, then add the courgettes and cook gently for 4 or 5 minutes

Whisk the eggs together and add to the mixture, cooking for a few minutes.

Once the eggs are cooked on the bottom, put the pan under a grill for a few minutes to cook the top.

Serve with fresh tomatoes and salad.


It's glut time again - Caramelised Onion Chutney

Onions - caramelised onion chutney


Ingredients
  • 3 Tbsp Olive Oil
  • 3 pounds Cooking Onions
  • 10 ounces Dark Brown Sugar
  • 7 fluid ounces Malt Vinegar
  • 3 Tbsp Red Wine Vinegar
  • 3 cloves Garlic, crushed
  • 1 Tbsp Wholegrain Mustard
  • pinch Salt
  • 1 small Chilli
  • pinch Paprika
Directions


Peel and slice onions very thinly.


Heat oil in large pan and very gently soften the onions, don't let them brown.

Add 3tbsp of the sugar and turn up heat to colour onions.

Add rest of sugar and remaining ingredients

Simmer until the mixture turns thick and a dark caramel colour (about 15 minutes.)

Spoon into sterilised jars (about 3 one pound jars,) and leave for six to eight weeks to mature.

It's glut time again - Runner Bean Chutney...

As the runner bean and courgette gluts are here now, and I have a lot of onions that I am unable to store (they bolted) I thought it was a good time to introduce a few recipes I am using to deal with gluts:

Green / runner beans - chutney


Ingredients
  • 2 medium onions, peeled and finely chopped
  • 2 cloves of garlic, peeled and crushed
  • Seeds from 15 cardomom pods
  • 1 tsp ground cumin
  • 1 tsp fenugreek seeds
  • 1/2 tsp chilli flakes
  • 120 ml vegetable oil
  • 225 g granulated sugar
  • 100 ml white wine vinegar
  • salt and freshly ground black pepper
  • 750 g green / runner beans, trimmed and cut in to 1-1.5cm pieces
Directions

Gently cook the onion, garlic and spices in the vegetable oil for 3-4 minutes without colouring until soft. 

Add the sugar and vinegar, season and simmer for a couple of minutes. 

Add the beans, cover with water, bring to the boil and simmer gently for 30 minutes. 

Remove from the pan, leave to cool and store in sterilised Kilner jars in a cool place for up to a couple of months. 

If you want to keep the chutney longer, the jars should be vacuum sealed.

Friday 3 June 2016

Plot 6 is a year old!

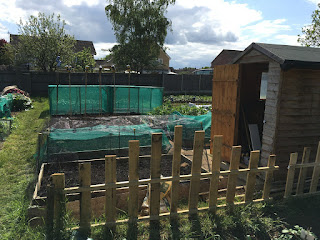
A few days ago was the 1 year anniversary of me getting hold of Plot 6 at Anson Way... In the last 12 months I have learnt a lot, but I've still got a long way to go!

Here are a couple of pics to remind you how much has happened in 12 months:


This time last year I was just beginning to dig the ground over for the first time. This year I am getting ready to harvest the broad beans and garlic, and over half of my crops for this year are planted - so far I have garlic, onions, potatoes (early and main crop), runner beans, broad beans, carrots, parsnips, spring onions, sweetcorn, peas, courgettes, beetroot, cucamelons, salad leaves, chives, asparagus, brussels sprouts, green cabbage, red cabbage, romanesco cauliflower and dahlias all planted out. There are a few things still to go out - leeks, more beetroot, tomatoes, more runner beans and the winter squashes (which will go where the garlic and onions are currently) but I am running out of room.

Broad Beans will begin harvesting this weekend!
I have really enjoyed my first year on this allotment, and the gang of people who have the other allotments around me are great.

Tuesday 31 May 2016

Brassicas

As I have built some large brassica cages this year I wanted to make sure that I didn't have to move them too often once the brassicas were planted. It is always a pain to get inside netting to keep the weeds under control, so I had to come up with another solution.

This year I am experimenting with weed control fabric. I prepared the soil by digging in plenty of well rotted farmyard manure then I covered it weed control fabric. Where a brassica is planted I just made a small slit in the fabric and planted through the slit. This (hopefully) has two advantages:

1) The weeds between the plants should be kept to a minimum
2) Rain water will naturally go through the slits so that the plants get the most benefit

Time will tell whether it works, but last Saturday I planted out brussels sprouts, kale, two types of cabbages and romanesco cauliflowers.

Brassica cages now planted

Tuesday 24 May 2016

Let's build a picket fence

One thing that I have been rather keen on is keeping my allotment boundaries tidy - I have a battery powered strimmer that I regularly use to keep the path edges under control, and I made sure that there was space behind my shed and first raised bed to give me a path between my allotment and the one behind.

What I really wanted though was a neat barrier between the allotments so I started collecting pallets. Once I had three or four I took my tools down and started breaking them down in to useable bits of timber.

There is a definite art to breaking down a pallet, and rather than re-writing something that has been written many times before I would suggest that you visit 1001 pallets and go to their tutorials section where you will find many useful tips!

As my pallets were varying sizes I found that I had different lengths of timber:

broken down pallets ready to become a fence
I decided that I could use this to my advantage in one of two ways - either make a fence where the pieces were all random, or create a more stylish design. I chose to go down what I think was the more stylish route:

Finished picket fence panel
The uprights were attached to the battens with screws and pins - the screws to make sure it didn't come apart (one screw at each 'crossover') and the pins to make sure that the fence stayed square.

For the moment I haven't treated or painted the fence, but later in the year when the weather improves I will paint them a suitable colour.

Finished panels in place


Monday 9 May 2016

Crop protection

Now that the weather is improving and I've planted some crops out I have decided that it is time to build some more permanent crop protection. My plan is to build 2 fairly large moveable brassica cages from wood and scaffold debris netting, and build a hoop and debris netting cover for the salad raised bed.

As the local hardware store sells timber in 2.4m lengths and the allotment is around 5.5m wide I decided on making the cages 1.2m high, 2.4m long and 2m wide. You may ask why I didn't make them 1.2x2.4x2.4 and the easy answer is that I purchased 2m wide debris netting and thought that 2m wide made more sense. If I had realised at the time how much you have to stretch 2m wide debris netting to actually make it 2m wide I would probably have gone for 1.2x2.4x2.4 and doubled up the netting in places...

I transported all my tools and timber/netting to the allotment early one saturday morning in the car and walked back down with essential supplies (Cider.)

My father is a retired cabinet maker so I have picked up a lot of skills with timber so it didn't take long to build the frames and make sure that they were sturdy and square. In fact I would estimate that it took longer to attach the debris netting with my faithful staple gun.

Brassica cages under construction - more timber needed!
Brassica cages under construction - just one to net up
Brassica cages completed and in final position
Once the brassica cages were built and in place I got on with protecting the salad raised bed - I had approximately 6m of blue flexible water pipe laying around so I cut it in to three equal lengths, screwed it to the sides of the raised bed with decking screws and large washers then attached the debris netting to one side of the bed with stables, attached a piece of timber to the other end of the netting and hey presto I had a protected raised bed. 

Protected raised bed


Tuesday 5 April 2016

Time to plant some potatoes

Learning from previous years when I planted everything very early and got caught out by a late frost, I have decided to hold on a bit this year as I figure that things planted a little late will always catch up pretty quickly. The things that I can't wait any longer for though are my early potatoes - International Kidney and Arran Pilot this year.

The seed potatoes have been chitting away in the garage for a couple of months now, and they are now definitely ready to continue their germination in the soil. Now that I'm on an allotment I don't have the luxury of an MF Tractor with a plough on the back as I have done in the past:


Richard Dixon preparing for potatoes at the old plot

This year it is going to be all done by hand! My process was slightly different to normal as some of the potatoes had fairly long chits on them and I was concerned that they would break when covered in soil, so this is what I did:

  1. Put out the line and dig a trench 8-10 inches deep
  2. Sprinkle a good helping of slug pellets in the bottom of the trench
  3. Place the seed potatoes in the bottom of the trench, with chits facing upwards
  4. Cover the seed potatoes with general purpose compost
  5. Sprinkle pelletised chicken manure on top of the compost
  6. cover the trench over and ridge slightly
It isn't really necessary to put a full ridge over the potatoes yet as I can do that later in the year when they start to appear above the ground. All there is to do now is wait until late June to harvest them!

Trench dug and slug pellets sprinkled

Seed potatoes in place

Covering of compost

Chicken manure applied

All planted

Tuesday 8 March 2016

New year, new start!

It's hard to believe that it is March already and spring has most definitely sprung! Here is an update of what has been done since my last post in October:

December 2015
  • Uncovered the broad beans as they were hitting the top of the small 'poly tunnel'
  • Harvested Leeks and Brussels Sprouts for christmas


January 2016
  • Tidied the shed and installed some shelving
  • Planted the last garlic (Solent Wight)
  • cleared away the remaining brassicas
  • covered half the allotment in a tarpaulin to try to keep the weeds at bay
February 2016
  • completed filling the raised beds with a compost and sand mixture
  • built the runner bean climbing frame
March 2016 (so far)
For valentine's day this year Jo gave me a couple of things that she considered essential for the allotment - a small hip flask and a portable DAB radio - what can I say other than what a great addition they make, along with my purchase of a 'thermos' flask. 

Most weekends in January and February were taken up with work, so I knew that I had to do a lot in a small space of time to get back on top of the allotment. Last Sunday was to be my first full day at the plot of the year, so I prepared myself - spare batteries for the radio, flask full of coffee, hip flask full of Chairman's Rum (the best Rum to come out of St. Lucia), 4 cans of cider, welly boots and plenty of layers of clothing.

Essential Allotment equipment
Having been down to the allotment the previous Tuesday afternoon to plant 8 asparagus crowns and remove the tarpaulin, I knew how bad everything was looking. After 5-6 hours of work I had managed to weed and feed the garlic/onions/broad beans and rough dig/weed more than 2/3 of the allotment.

2/3 dug

I wasn't finished though, so on Monday afternoon I trekked down again with some more coffee and rum to finish the digging.

All dug

During my recent visits I have been pleased to notice that the asparagus crowns are already shooting through the soil - it is obviously warmer than I had imagined. I plan to plant some asparagus seeds towards the end of the month to supplement the crowns.

We have Asparagus