Tuesday 31 May 2016

Brassicas

As I have built some large brassica cages this year I wanted to make sure that I didn't have to move them too often once the brassicas were planted. It is always a pain to get inside netting to keep the weeds under control, so I had to come up with another solution.

This year I am experimenting with weed control fabric. I prepared the soil by digging in plenty of well rotted farmyard manure then I covered it weed control fabric. Where a brassica is planted I just made a small slit in the fabric and planted through the slit. This (hopefully) has two advantages:

1) The weeds between the plants should be kept to a minimum
2) Rain water will naturally go through the slits so that the plants get the most benefit

Time will tell whether it works, but last Saturday I planted out brussels sprouts, kale, two types of cabbages and romanesco cauliflowers.

Brassica cages now planted

Tuesday 24 May 2016

Let's build a picket fence

One thing that I have been rather keen on is keeping my allotment boundaries tidy - I have a battery powered strimmer that I regularly use to keep the path edges under control, and I made sure that there was space behind my shed and first raised bed to give me a path between my allotment and the one behind.

What I really wanted though was a neat barrier between the allotments so I started collecting pallets. Once I had three or four I took my tools down and started breaking them down in to useable bits of timber.

There is a definite art to breaking down a pallet, and rather than re-writing something that has been written many times before I would suggest that you visit 1001 pallets and go to their tutorials section where you will find many useful tips!

As my pallets were varying sizes I found that I had different lengths of timber:

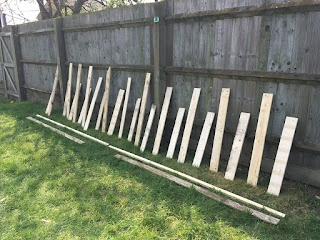
broken down pallets ready to become a fence
I decided that I could use this to my advantage in one of two ways - either make a fence where the pieces were all random, or create a more stylish design. I chose to go down what I think was the more stylish route:

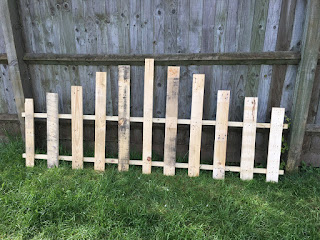
Finished picket fence panel
The uprights were attached to the battens with screws and pins - the screws to make sure it didn't come apart (one screw at each 'crossover') and the pins to make sure that the fence stayed square.

For the moment I haven't treated or painted the fence, but later in the year when the weather improves I will paint them a suitable colour.

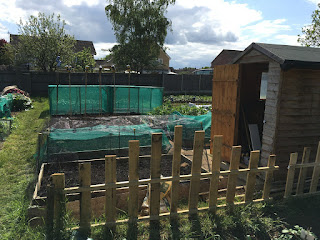
Finished panels in place


Monday 9 May 2016

Crop protection

Now that the weather is improving and I've planted some crops out I have decided that it is time to build some more permanent crop protection. My plan is to build 2 fairly large moveable brassica cages from wood and scaffold debris netting, and build a hoop and debris netting cover for the salad raised bed.

As the local hardware store sells timber in 2.4m lengths and the allotment is around 5.5m wide I decided on making the cages 1.2m high, 2.4m long and 2m wide. You may ask why I didn't make them 1.2x2.4x2.4 and the easy answer is that I purchased 2m wide debris netting and thought that 2m wide made more sense. If I had realised at the time how much you have to stretch 2m wide debris netting to actually make it 2m wide I would probably have gone for 1.2x2.4x2.4 and doubled up the netting in places...

I transported all my tools and timber/netting to the allotment early one saturday morning in the car and walked back down with essential supplies (Cider.)

My father is a retired cabinet maker so I have picked up a lot of skills with timber so it didn't take long to build the frames and make sure that they were sturdy and square. In fact I would estimate that it took longer to attach the debris netting with my faithful staple gun.

Brassica cages under construction - more timber needed!
Brassica cages under construction - just one to net up
Brassica cages completed and in final position
Once the brassica cages were built and in place I got on with protecting the salad raised bed - I had approximately 6m of blue flexible water pipe laying around so I cut it in to three equal lengths, screwed it to the sides of the raised bed with decking screws and large washers then attached the debris netting to one side of the bed with stables, attached a piece of timber to the other end of the netting and hey presto I had a protected raised bed. 

Protected raised bed